Notice. New forum software under development. It's going to miss a few functions and look a bit ugly for a while, but I'm working on it full time now as the old forum was too unstable. Couple days, all good. If you notice any issues, please contact me.
matherp Guru Joined: 11/12/2012 Location: United KingdomPosts: 12033
Posted: 10:24am 13 Oct 2026
Copy link to clipboard
Print this post
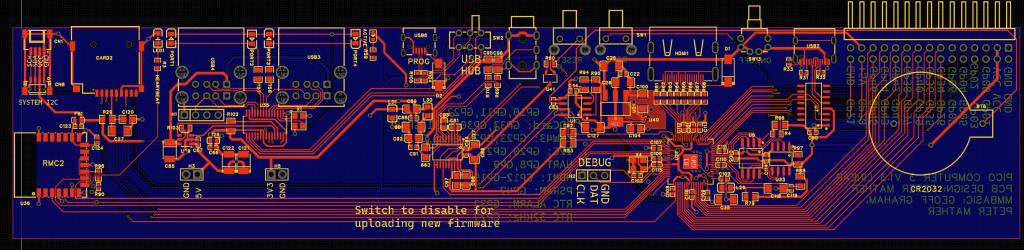
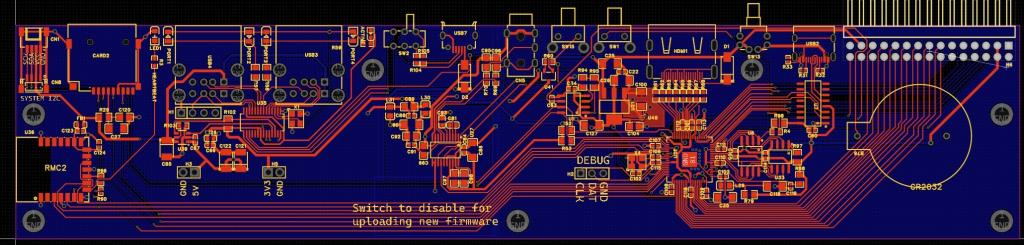
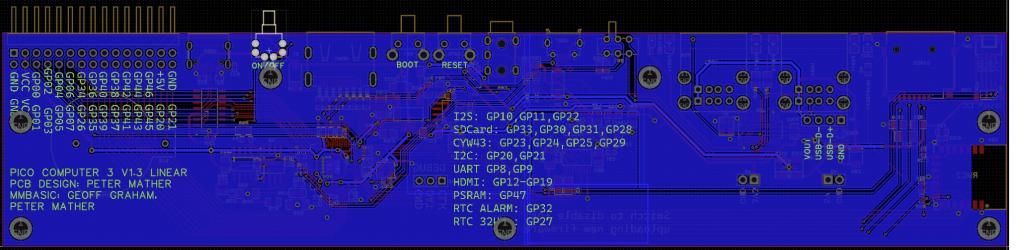
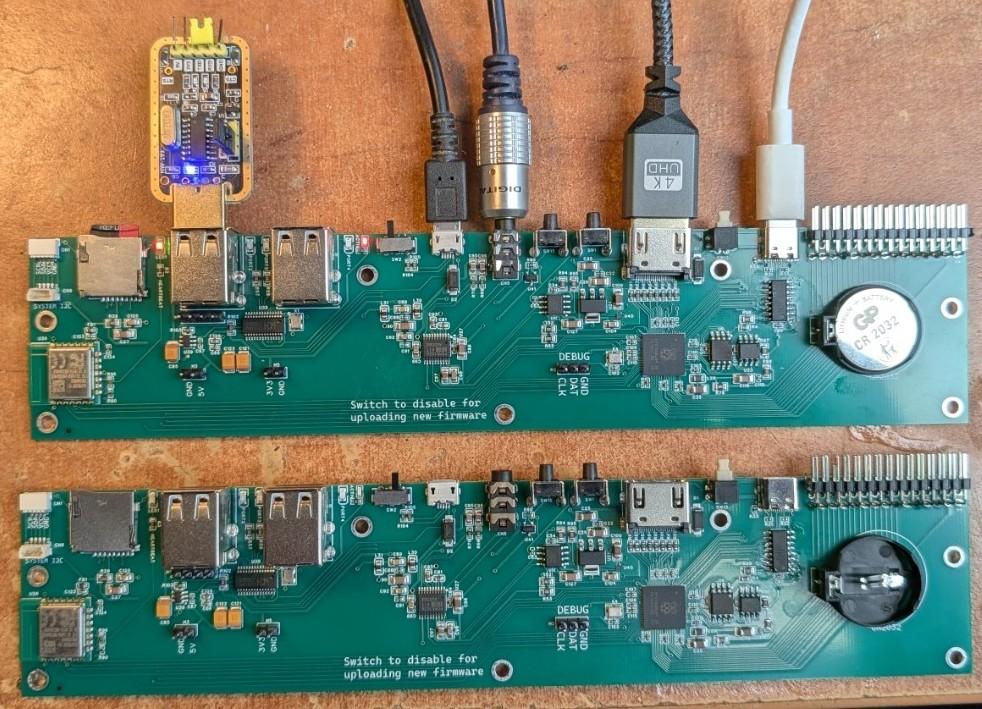
I thought it might be fun to re-do the Pico Computer 3 in a form that could be built into a keyboard. This is the identical circuit with the addition of an internal USB header, a 5V header, and a 3.3V header. I haven't built it but if anyone is interested I can post the gerbers. It passes all the design rule checks and as the circuit is the same it should just work. The idea is that you could take a usb or bluetooth keyboard and with a bit of modification build this circuit into it. Everything you need is accessible along single edge of the board. The board is 225x48mm
hhtg1968 Senior Member Joined: 25/05/2023 Location: GermanyPosts: 247
Posted: 11:06am 13 Oct 2026
Copy link to clipboard
Print this post
cool idea.
I am searching in the internet for a keyboard case/ housing. or for a version to print in 3d...
I like my old amstrad cpc 464 and c64 very much.
perhaps it fits into an eyisting keyboard...
what is the height of the board incl. components?
perhaps you can arrange the usb ports side by side (not above)?
matherp Guru Joined: 11/12/2012 Location: United KingdomPosts: 12033
Posted: 11:19am 13 Oct 2026
Copy link to clipboard
Print this post
height is identical to a normal PC3 which is the height of the USB connectors, just under 20mm from the biggest solder blob to the top of the usb connector
hhtg1968 Senior Member Joined: 25/05/2023 Location: GermanyPosts: 247
Posted: 11:44am 13 Oct 2026
Copy link to clipboard
Print this post
thank you.
and what is your opinion to usb ports side by side to reduce hight?
Good morning! I'm writing from Italy. Congratulations on the idea of bringing it to a "keyboard" format. I'm working on a mechanical keyboard with customizable linear mechanical keys...
Mixtel90 Guru Joined: 05/10/2019 Location: United KingdomPosts: 9220
Posted: 12:11pm 13 Oct 2026
Copy link to clipboard
Print this post
It takes up a lot more space along the back. A bit more than twice as much as using two doubles as you have to leave an extra gap. The double ones are about 15mm high from the surface of the PCB. A single horizontal sticks up a touch under 7mm.
For comparison the RTC battery holder sticks up about 8mm above the board and male pin headers around 9mm.Mick
hhtg1968 Senior Member Joined: 25/05/2023 Location: GermanyPosts: 247
Posted: 01:36pm 13 Oct 2026
Copy link to clipboard
Print this post
the on/off switch between hdmi and usb-c ist not reachable for persons with not so thin fingers (on my pico 3 I use a toothpick).
mozzie Guru Joined: 15/06/2020 Location: AustraliaPosts: 468
Posted: 01:38pm 13 Oct 2026
Copy link to clipboard
Print this post
G'day, A quick check against the PC3 board shows the single height USB sockets I have here fit the lower location of the double height sockets, and are the correct orientation.
Considering you have one connected to the internal pin header for the internal keyboard connection, that leaves 2 external if you want extra low profile.
Hopefully that's enough
Regards, Lyle.
matherp Guru Joined: 11/12/2012 Location: United KingdomPosts: 12033
Posted: 01:48pm 13 Oct 2026
Copy link to clipboard
Print this post
There is 8mm more space around the switch on this layout.
We need to make sure that mmbasic is configurable with an external file to assign the pinout on HSTX and PIO, LED, BUZZER, etc etc so we don't go crazy developing new hw projects. Renato
matherp Guru Joined: 11/12/2012 Location: United KingdomPosts: 12033
Posted: 02:52pm 13 Oct 2026
Copy link to clipboard
Print this post
Check the manual. All normal builds are configurable within the limits of the H/W but the PC3 build is not. It is specific for this configuration which can be considered a reference design and many dozens have been built and are in use. Edited 2026-10-14 00:56 by matherp
Hawk Senior Member Joined: 15/07/2021 Location: AustraliaPosts: 159
Posted: 11:22pm 13 Oct 2026
Copy link to clipboard
Print this post
I have been looking for a design that can be incorporated into a all-in-one Atari style case with a modern keyboard (preferably mechanical). I have had several attempts to model a case for an existing keyboard. My last attempt was goign well until my laptop crashed. I no longer use Windows 11. Unfortunately that also means that I no longer have access to the CAD package I was using, and I'm having to learn FreeCAD. This may be incentive to get back to that project.
calcmandan Newbie Joined: 24/07/2020 Location: United StatesPosts: 22
Posted: 05:10am 14 Oct 2026
Copy link to clipboard
Print this post
wow this is damn close to the project i'm working on, other than one usb port on mine being dedicated to the keyboard.
Yes, gerber please.
I thank you immensely. Beautiful design. Edited 2026-10-14 16:18 by calcmandancalcmandan sysop : air & wave bbs finger : calcmandan@bbs.erb.pw
al18 Senior Member Joined: 06/07/2019 Location: United StatesPosts: 252
calcmandan Newbie Joined: 24/07/2020 Location: United StatesPosts: 22
Posted: 06:49am 14 Oct 2026
Copy link to clipboard
Print this post
If you'd like to collaborate, I'm along on a project now with my own mechanical matrix and it would be a hoot to work with someone else. A lion's share of the design is complete at this point. If you're interested send me a pm and we can discuss.
A close colleague is willing to help with the keyboard shell design since he does a thorough amount of 3d printing and has many colors in his inventory - would need to check the gerber files for mounting holes when they are released to us.calcmandan sysop : air & wave bbs finger : calcmandan@bbs.erb.pw
matherp Guru Joined: 11/12/2012 Location: United KingdomPosts: 12033
Posted: 11:53am 14 Oct 2026
Copy link to clipboard
Print this post
Here are the design files. Use at your own risk. They should be correct in that the schematic is the same as the PC3 and the layout passes all design checks. I have ordered a couple myself. I leave off the through-hole parts and solder those myself to save a bit of money. JLC are currently out-of-stock of the CH340C but these are easy to acquire and solder. When ordering the BOM doesn't tick the programming USB as it needs special attention which costs an extra $0.30 so remember to tick it if you can stand the extra cost
The board is 225 x 48mm The mounting holes are at 4,4 4,28 80,38 112.5,4 165,38 221,4 221,28 measured from the bottom left of the PCB as pictured
The location of the centres of the edge components are: Qw/ST 4 SD 19.7 USB1 43.1 USB2 65.7 Prog/USB switch 87.1 Prog-USB 99.3 Audio 113.2 Reset switch 123.8 Boot switch 134.2 Power switch 165.4 HDMI 178.9 I/O 204.8 These measurements assume that the centres reported by the parts footprints are correct. Edited 2026-10-14 21:57 by matherp
hhtg1968 Senior Member Joined: 25/05/2023 Location: GermanyPosts: 247
Posted: 11:57am 14 Oct 2026
Copy link to clipboard
Print this post
Here is a link to a project I found in the internet.
calcmandan Newbie Joined: 24/07/2020 Location: United StatesPosts: 22
Posted: 05:13am 15 Oct 2026
Copy link to clipboard
Print this post
Well I just ordered the board from jlcpcb. Wave 1 this is goign to be a functionality test. Looking forward to it.calcmandan sysop : air & wave bbs finger : calcmandan@bbs.erb.pw
calcmandan Newbie Joined: 24/07/2020 Location: United StatesPosts: 22
Posted: 07:00pm 17 Oct 2026
Copy link to clipboard
Print this post
My order of five keyboard editions are in production @ jlcpcb. I will be testing one for functionality. I will likely keep a second, and likely sell off the other three to other parties interested in having one.
Probably a few dollars plus shipping. US only.
I'll drop notes as things progress.calcmandan sysop : air & wave bbs finger : calcmandan@bbs.erb.pw
matherp Guru Joined: 11/12/2012 Location: United KingdomPosts: 12033
Posted: 12:25pm 19 Oct 2026
Copy link to clipboard
Print this post
Boards have arrived and work perfectly. I'm working on an endplate to fit over the various connectors and then next steps will be to choose a keyboard and try to make it all work together
Edited 2026-10-19 23:33 by matherp
Page 1 of 3
Print this page
The Back Shed's forum code is written, and hosted, in Australia.

 Notice. New forum software under development. It's going to miss a few functions and look a bit ugly for a while, but I'm working on it full time now as the old forum was too unstable. Couple days, all good. If you notice any issues, please contact me.


 Print this post